Wednesday, October 19, 2011

2011 Tablesetting - Raising Money For The Mansion

Yesterday was the 2011 McHenry Mansion Tablesetting Fundraiser and this year we thought it was for the birds...no really, that was our theme...Birds of a Feather!

this pic is from my phone

The creative process is a strange and wonderful thing and it's that process that makes doing events like this so much fun.  We knew we wanted to use china and glassware from Linda's grandmother which has green, yellow and brown in it and we wanted a lighthearted theme without being "cartoonish" (is that a word?)  How we arrived from a cardboard carpet roll to our finished table design is that intangible thing that just happens when we start thinking out loud and then go shopping.  

This is McHenry Mansions' biggest fundraiser of the year...more than the Holiday or Mothers' Day Teas and a lot of work goes into organizing it.  There were thirtysix tables this year and what is so much fun is that in most cases, the tables created represented something personal to the tablesetter.  The first day it is open to the public for viewing for $10 and the following day is the actual luncheon.  This year it was catered by Green's Market...one of our faves and I should have taken a picture of our lunch...Delicious!  
We always seem to take the DIY approach to many of our projects so armed with glue guns, lots of moss, birds, sticks and a few other things we came up with our creation and we'll show you some of the other tables that were our favorites...enjoy!


We cut down the cardboard tube and secured it in a gallon can filled with plaster of paris.  Doesn't it look great?  Ummm, no!  


Here is the table being setup.  Building the layers is wicker for texture, a green charger and the china.


Now, let's bring in some color and our bird notebook favors for our lovely ladies...

Each placesetting had a different color napkin, pulled from the color of the tablecloth.  You can see how lovely the china is here.


It's very tall...people asked us where we bought it.  Um, we made it actually.  We should have taken pictures of putting it in the car...YouTube worthy!

Little birdies...

We rented chairs and decided to dress them simply with burlap and ribbon as the centerpiece was, did we say it before?  quite large.

   Now some more inspiration.

Autumn beauty

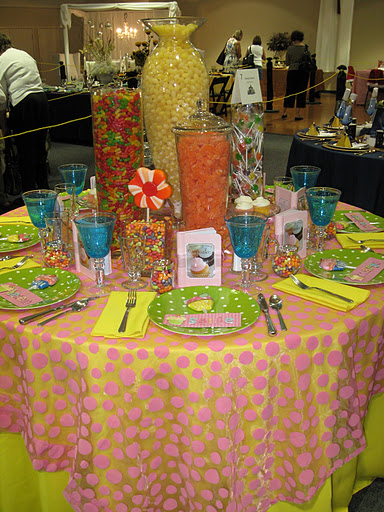
CandyLand...there's enough to last til Halloween!

 a little honey for you


This table incorporated items brought back from a trip to China

Can you tell this was the guys table...

You can take a trip to Africa...

or go to a nine year olds birthday party...

See how everyone's inspiration is a little different?


Ok, so Grand Events has a little advantage over the rest of us...


and finally with Christmas just around the corner, some little elves made an appearance!


 how cute are these chair covers?

Very Creative People...!
McHenry Mansion has a dedicated group of docents who were the servers and committee members...they did an awesome job and we can't wait for next year!

Elementally,

Linda and Michele


Thursday, October 13, 2011

Pretty Pumpkins - Day 4

If you know us at all, you know we're suckers for sparkle.  Ok, glitter really.  Linda will spray glitter just about anything.  So we selected these little mini pumpkins for Day 4 because they're called...wait for it... Glittered Pumpkins.


Here are the step-by-step instructions from stylist.com...

The process is pretty straightforward: Just brush the pumpkin with glue, then sprinkle with glitter. But to ensure success, follow these editor-tested tips:
- Elevate the pumpkin. To reach trickier places with ease (and allow excess glitter to settle), create a "pumpkin platform": place an old cooling rack atop a baking sheet lined with wax paper.
- Let the glue dry beforehand. In this craft, tacky is good. For maximum adhesion, let glue dry for 30 seconds-1 minute before applying glitter.
- Use nice glitter. There's nothing wrong with standard glitter, but it can be a little chunky. For the most sophisticated sparkle, try a finer glitter. I like Art Institute Ultrafine Glitter.
This would be stunning on larger pumpkins as well, so get your glitter on and show some sparkle.
Elementally,
Michele and Linda


Pretty Pumpkins - Day 3

Today's pumpkin inspiration is from Country Living magazine and for those of you who love decoupage, this is the one for you.


Front and center on the cover...actually made me buy the magazine because the possibilities are endless!


These were inspired by the CL cover here


Love this one that is all over Pinterest...

You can use paper (scrapbooking, wrapping paper, etc) or fabric.  Mod Podge or watered down white glue to adhere and seal your paper or fabric, a pair of scissors and you're all set. Cut the paper/fabric in strips to fit your pumpkin and attach with Mod Podge.  The glue seals your pumpkins if you use real ones so they should last long into the season.  This is another way to put a completely personal spin on how you decorate for Fall and that's what makes your home...well, your home!

Elementally,

Michele and Linda

Pretty Pumpkins - Day 2

It's Day 2 of our pumpkin inspiration and if you like glam, you're going to love this one. Found on Flickr here.  A black funkin (fake craft pumpkin) from Target was used along with rhinestones to add the bling.  You could use orange or white pumpkins and rhinestone color of choice to match your decor.  Fire up the hot glue gun!


The stem is painted with metallic paint to complete the look...if you're not into cutesy Halloween decorating this could be an elegant centerpiece with some crystal candlesticks and black tapers.  Tres Chic!

Elementally,

Michele and Linda

Monday, October 10, 2011

DIY - Embellished Sparkly Pumpkins

Can I just say how much I love Target...and especially the bargain section right as you walk in the door.  I'm telling you, lots of treasures to be had if you look!  I found these faux pumpkins that came in green, orange and purple.  The green ones had me at first glance so I picked up some ribbon and a feather boa, fired up my hot glue gun and voila!  Easy, quick and cheap and I can use them again for a couple of years!


So here we go...


So the supplies I used were the faux pumpkins from Target, which I paid a whopping $2.50 for, hot glue gun and glue sticks, some ribbon (you can use anything to create the look you want) and a feather boa.

I started at the top and placed hot glue down the pumpkin at intervals to secure it.  I wrapped it from the top, down around the bottom and up the other side.  You can use one kind of ribbon or two like I did here.  


Once I had the ribbon looking the way I wanted, it was time to add the finishing touch and that was where my little furry boa came into play.  I placed the boa around the top to figure what was needed and cut that length. Using the glue gun, I just hot glued it to the top and voila...a little fur ball fluff on top of the pumpkin.  Hides your ribbon ends and looks cute too!  For $8 and an hour of my time, I got two one of a kind glitter pumpkins that you'll never see in any pumpkin patch!


Looks like a critter is taking up residence!


This is the professional shot taken by the talented Austin Stevenot, who also just did our professional headshots (although they're really not headshots...they're way better.  Thanks Austin!

Elementally,

Michele and Linda


Thursday, October 6, 2011

How to "BOO" Your Friends and Neighbors

We love Kim Stoegbauer of TomKat Studio.  She is one of the most creative designer/bloggers out there and always shares fabulous hosting and party ideas but her recent post on October 1st had us at "BOO" and we are excited to share it with you!


This is not a tradition I had heard of but it's a little like the May Day tradition when you anonymously leave flowers on your friends/neighbors doorstep, only with a delicious Halloween twist. This is a great way to welcome someone new to the neighborhood and your kids will love being a part of the fun!  Enjoy...

TomKat Studios Free Printable Halloween Boo Sign


Elementally,


Michele and Linda

Monday, October 3, 2011


As promised.......................................... Our front doors decorated for Fall!


This year Michele decided to re-purpose two wreaths that she already had but were dated and had not been used for a couple of years.


For the front door, she purchased some new silk flowers and the letter B as kind of a monogram for the door. She snipped off the stuff she didn't like and then hot glued a new chocolate brown sunflower and two green hydrangeas unto the wreath. She added a garland of berries to match. For the B, she painted it a metallic copper (Martha Stewart paints - two coats).


Martha Stewart Copper Metallic Paint

Once it was dry she attached it with wire to make sure it didn't go anywhere and then painted the wire to match.


Michele's repurposed front door wreath looking beautiful on her front door. For her side door she uses the second wreath and strips it completely bare because it was U G L Y!


Old fruit that wasn't even reusable. A little "Happy Fall" sign that she found last week fit on the wreath perfectly and she just wired it on..............so easy.


Once a bow was added, it's ready to go, so lets see what it looks like on the door!


Double doors, double wreaths!  I decided to use wreaths that I purchased last year on clearance for my front doors this year.  But I need the glitz and glam so I decided to glitter them up! 


I used gold glitter spray to bring out the shine and add another dimension to the wreaths.


You only get to see the doors right now as we are going out today to get pumpkins to finish our outside Fall decor!

We've shown you ours...............now it's your turn.  Email us your pics of your Fall decor, either inside or out and share what you love about Fall!

Elementally,

Linda and Michele 

Saturday, October 1, 2011

Ahhhhhhhhhhh! It's Fall again and the wonderful holiday party season is upon us.


Dinner parties and open houses are the norm for the season! And what would these soirees be without a small token of friendship from you the hostess to your guests? What am I talking about? Party favors! Party favors are the perfect accent to a tablescape and a perfect little gift to celebrate the presence of your guests in your home. We tend to associate favors with weddings and other large special events in one's life, but what is more special than having friends over for dinner? Party favors are fun, easy to do, fits a theme, and adds another dimension to your tablescape!


aclassicpartyrental.com


A clever idea wrapping the favor up in an napkin and securing the top with a napkin ring. How cute!


Purchased split bottles of wine and wrapped in purple and orange tulle and tied with black bow for my Halloween Bash last year.


Michele and I participated in the McHenry Mansion Foundation Tablesetting fundraiser
last year with a our theme Rockin' Morrocan. As our party favor we used a jeweled box
from Pier One, filled it with a yummy lavender truffle, added a name card that matched
the theme and tied with a bow.

savingprettypennies.com


What a cute idea! A ice cream bar favor make with Rice Krsipie bars dipped in chocolate with added candy sprinkles, a pretzel for the stick and tied with a orange bow!

interiordec.about.com

What a fun favor for a fall or thanksgiving table! A little gold spray glitter perhaps to dress it up! I am all about the glam!

thriftyfun.com


What says fall like a yummy caramel apple? This one wrapped in a cellophane bag tied with a leaf and raffia. Very special to your guests because you took the time to make something for them!

perfect-party-favors.com

This little jar of honey is perfect for the Fall season as a favor. Tie a bow on the bottle and place the guest's name on it! Favors can double as place cards!

Be creative and have fun with your party favors! Favor ideas include candles, tea towels, wine stops, truffles, tree ornaments, note pads, kitchen gadgets, and for the guys try a little bottle of liquor or a cigar. We love to shop World Market, Pier One, Target, or even the Dollar Store to come up with inexpensive but unique party favors! Your guests will be impressed!

Elementally,

Linda and Michele


Related Posts Plugin for WordPress, Blogger...